After going through Official configuration guide then I realise that there should be one step by step guide with snapshots for newcomers or who are not familiar with Asterisk PBX and Linux.
I tried to make this step by step very simple and more understandable for all, so please give me any suggestion from your side to make this documentation better.
I have separated configuration parts in different steps.
1) Scenario with Network Diagram.
2) Required Software’s.
3) Vtiger Side Configuration.
4) Asterisk Side Configuration.
5) Troubleshooting.
4) Asterisk Side Configuration.
5) Troubleshooting.
Network Diagram

Vtiger Server:
Windows 7 32 bit , Dual Core CPU , 4 GB RAM , 40 GB HDD.
Vtiger 6.1
Zoiper SIP Soft Client with 2009 Extension Configured.
Asterisk Server:
Dual Core CPU , 4 GB RAM , 40 GB HDD
AsteriskNOW 5.211.65 (User Any Asterisk Based PBX like FreePBX , Elastix etc..)
Java Jetty Installed.
Note : this scenario has been developed in Virtual Environment ( Vmware Workstation 10 ) in my case.
Configure your Asterisk credentials in Vtiger
After installing Vtiger Asterisk Connector, please follow few simple steps to configure your Asterisk Server information in Vtiger CRM :
1. Login to your CRM instance and click on
2. Click CRM Settings.
3. Click PBX Manager under Integration in Settings sidebar.
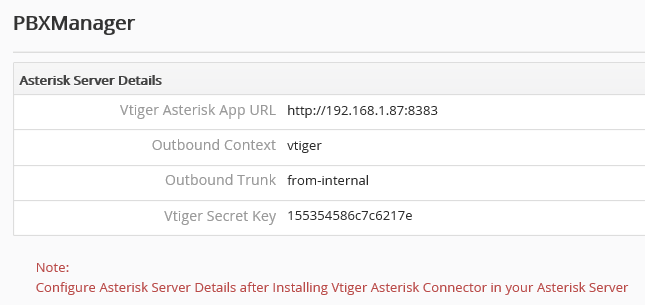
4. Edit Asterisk Server Details.
Vtiger Asterisk App URL - configure server name where Vtiger Asterisk Connector is installed as shown:
Syntax : Protocol://Asterisk_Server_IP:Port
Protocol
|
http/https
|
Asterisk_Server_IP
|
Your Asterisk Server IP
|
Port
|
Server Port configured in Vtiger Asterisk Connector config file.
|
Outbound Context - Vtiger specific context configured in your Asterisk Server
Outbound Trunk - Trunk configured in your Asterisk server for Outgoing Calls.
Vtiger Secret Key - Unique key generated for authentication, which has to be configured in Vtiger Asterisk Connector.
5. Click Save button.
Note : in my case I am not using any trunk for Outgoing Calls, I just want to test internal Calls only in my LAB. So please Add your Outbound trunk Name which is configured inAsterisk GUI -> Connectivity -> Trunks. ( Name is Case Sensitive so be careful ).
For each user who is allowed to handle incoming and outgoing calls from the CRM, the extension number should be configured in the User preferences page.
1. Open My Preferences.
2. Configure user number in CRM Phone Extension field under “More Information” block.
Number format:
Extension: [Extension_number]
e.g., 2001
Once configuration is completed on both sides i.e., Vtiger and Asterisk, you are now ready to make and receive calls in the CRM.

Vtiger Asterisk Connector Installation on Asterisk Server
Introduction
Vtiger Asterisk application acts a gateway to connect to Vtiger CRM from the Asterisk Server. It makes it easy for Vtiger and Asterisk interaction over HTTP when incoming or outgoing calls need to be handled.
Features
Vtiger Asterisk Connector provides following features:
1. Connect to Vtiger and notify the incoming call.
2. Accept commands from Vtiger and forward it to Asterisk (Click-to-Call).
3. Call recording file management.
Installation.
1. Download Asterisk Connector ( PBXMagager )Add-on from Official Website.

3. Transfer VtigerAsteriskConnector-1.2.zip to root folder ( / ).
4. Login to Asterisk Server by using putty.exe or ssh terminal and unzip VtigerAsteriskConnector with “unzip VtigerAsteriskConnector-x.y.zip” Command.
5. Open /VtigerAsteriskConnector/conf/ VtigerAsteriskConnector.properties and update information as below.

6. Copy and Paste the Vtiger Secret Key that is generated in your Vtiger Instance.
You can find this under Vtiger CRM > Settings > Integration > PBXManager > Asterisk Server Details.
7. Copy Vtiger URL exact the same because it is case sensitive so better to copy and paste from web browser.
8. Cd /VtigerAsteriskConnector/Bin
9. ./Start.sh
10. Test Vtiger Connector website is working or not http://192.168.1.87:8383 the result should be as below.

11. If you find above result then you are ready with VtigerAsteriskConnector Configuration.
Asterisk Configuration File Changes
1) Change In extensions.conf ( /etc/Asterisk/extensions_custom.conf )


Create Vtiger SIP Extension
1) Open Asterisk GUI -> Applications -> Extensions.
2) Create SIP Extensions.

Configure Asterisk Manager User
1) Open Asterisk GUI -> Settings -> Asterisk Manager Users
2) Create “vtiger” User with ALL Permission.
3) Make 0.0.0.0 / 0.0.0.0 in Deny Entry.
4) Permit127.0.0.1/255.255.255.0&192.168.1.0/255.255.255.0&192.168.1.94/255.255.255.255
5) Click on Submit.
6) Save Changes.

Check /etc/Asterisk/manager_additional.conf

Add VtigerAsteriskConnector Script in to startup.
1) Open Asterisk server terminal and give below command.
2) Echo sh /VtigerAsteriskConnector/bin/start.sh >> /etc/rc.local
Troubleshooting
1) Monitor Logs in /VtigerAsteriskConnector/Logs
a. nohup.webapp.<date>.out
b. nohup.agi.<date>.out
2) Start or restart VtigerAsteriskConnector Scripts /VtigerAsteriskConnector/bin/
a. Start.sh
b. Stop.sh
c. Agi.sh
d. Webapp.sh
3) Check webapp is running or not by visiting http://192.168.1.87:8383 it should show above Scripts in browser.
Hello, Thank for your article
ReplyDeleteI have a question, i have 10 extension, and to did number, now I want to set one did for 5 extension and another did for another 5 extension in incoming call.
Thanks
Nahid
How To Solve Programming Errors >>>>> Download Now
Delete>>>>> Download Full
How To Solve Programming Errors >>>>> Download LINK
>>>>> Download Now
How To Solve Programming Errors >>>>> Download Full
>>>>> Download LINK co
first of all thank you for the detailed guide,but i have applied everything you said, but nothing work! do i have to add a special trunk for this operation?
ReplyDeletedoes'nt work
ReplyDeletevtiger is installed as on demand using vtiger own servers, and the asterisk is on premises,
ReplyDeletevtiger ip: external public ip (52.202.12.179)
My asterisk server: internal lan 192.168.0.40 ( should i put my external public ip)
thanks for the tutorial, I've followed all the steps but still I'm getting this error,
ReplyDelete[INFO] 2017-07-19 04:48:39 a a Outbound Call
[INFO] 2017-07-19 04:48:39 a a Asterisk Login Successfull
[INFO] 2017-07-19 04:48:39 a a Successfully Authenticated Vtiger Secret Key
[INFO] 2017-07-19 04:48:39 org.asteriskjava.manager.internal.ManagerConnectionImpl info Connecting to 172.0.20.80:5038
[INFO] 2017-07-19 04:48:39 org.asteriskjava.manager.internal.ManagerConnectionImpl info Connected via Asterisk Call Manager/2.10.0
[WARN] 2017-07-19 04:48:39 org.asteriskjava.manager.internal.ManagerConnectionImpl warn Unsupported protocol version 'Asterisk Call Manager/2.10.0'. Use at your own risk.
[INFO] 2017-07-19 04:48:40 org.asteriskjava.manager.internal.ManagerReaderImpl info Terminating reader thread: No more lines available: null
[INFO] 2017-07-19 04:48:40 org.asteriskjava.manager.internal.ManagerConnectionImpl info Closing socket.
[FATAL] 2017-07-19 04:48:40 com.vtiger.apps.asterisk.webapp.c.b a
org.asteriskjava.manager.AuthenticationFailedException: Authentication failed
at org.asteriskjava.manager.internal.ManagerConnectionImpl.doLogin(ManagerConnectionImpl.java:578)
at org.asteriskjava.manager.internal.ManagerConnectionImpl.login(ManagerConnectionImpl.java:438)
at org.asteriskjava.manager.internal.ManagerConnectionImpl.login(ManagerConnectionImpl.java:423)
at org.asteriskjava.manager.DefaultManagerConnection.login(DefaultManagerConnection.java:294)
at com.vtiger.apps.asterisk.webapp.a.a.a(Unknown Source)
at com.vtiger.apps.asterisk.webapp.c.b.a(Unknown Source)
at com.vtiger.apps.asterisk.webapp.c.b.doPost(Unknown Source)
at javax.servlet.http.HttpServlet.service(HttpServlet.java:755)
at javax.servlet.http.HttpServlet.service(HttpServlet.java:848)
at org.eclipse.jetty.servlet.ServletHolder.handle(ServletHolder.java:684)
at org.eclipse.jetty.servlet.ServletHandler.doHandle(ServletHandler.java:501)
at org.eclipse.jetty.server.handler.ScopedHandler.handle(ScopedHandler.java:137)
at org.eclipse.jetty.security.SecurityHandler.handle(SecurityHandler.java:557)
at org.eclipse.jetty.server.session.SessionHandler.doHandle(SessionHandler.java:231)
at org.eclipse.jetty.server.handler.ContextHandler.doHandle(ContextHandler.java:1086)
at org.eclipse.jetty.servlet.ServletHandler.doScope(ServletHandler.java:428)
at org.eclipse.jetty.server.session.SessionHandler.doScope(SessionHandler.java:193)
at org.eclipse.jetty.server.handler.ContextHandler.doScope(ContextHandler.java:1020)
at org.eclipse.jetty.server.handler.ScopedHandler.handle(ScopedHandler.java:135)
at org.eclipse.jetty.server.handler.HandlerList.handle(HandlerList.java:52)
at org.eclipse.jetty.server.handler.HandlerWrapper.handle(HandlerWrapper.java:116)
at org.eclipse.jetty.server.Server.handle(Server.java:370)
at org.eclipse.jetty.server.AbstractHttpConnection.handleRequest(AbstractHttpConnection.java:494)
at org.eclipse.jetty.server.AbstractHttpConnection.headerComplete(AbstractHttpConnection.java:971)
at org.eclipse.jetty.server.AbstractHttpConnection$RequestHandler.headerComplete(AbstractHttpConnection.java:1033)
at org.eclipse.jetty.http.HttpParser.parseNext(HttpParser.java:644)
at org.eclipse.jetty.http.HttpParser.parseAvailable(HttpParser.java:235)
at org.eclipse.jetty.server.AsyncHttpConnection.handle(AsyncHttpConnection.java:82)
at org.eclipse.jetty.io.nio.SelectChannelEndPoint.handle(SelectChannelEndPoint.java:667)
at org.eclipse.jetty.io.nio.SelectChannelEndPoint$1.run(SelectChannelEndPoint.java:52)
at org.eclipse.jetty.util.thread.QueuedThreadPool.runJob(QueuedThreadPool.java:608)
at org.eclipse.jetty.util.thread.QueuedThreadPool$3.run(QueuedThreadPool.java:543)
at java.lang.Thread.run(Thread.java:748)
How To Solve Programming Errors >>>>> Download Now
ReplyDelete>>>>> Download Full
How To Solve Programming Errors >>>>> Download LINK
>>>>> Download Now
How To Solve Programming Errors >>>>> Download Full
>>>>> Download LINK IO